
.png)
TABLE OF CONTENTS

Have questions or want a demo?
Benchmarking is crucial to assess the performance and scalability of your Oracle Database, particularly when simulating real-world transaction-heavy workloads. One of the best tools to achieve this is HammerDB, which supports a wide range of databases, including Oracle. In this blog post, we'll focus specifically on the TPCC benchmark—a transaction processing benchmark used to evaluate the performance of OLTP (Online Transaction Processing) systems like Oracle Database.
At Tessell, we regularly benchmark our databases on different public clouds to assess database transaction latency and throughput. For the purpose of this blog, we are going to run a benchmark on our latest offering on Google Cloud.
What is TPCC Benchmark?
The TPCC (Transaction Processing Performance Council) benchmark is designed to simulate an OLTP system's performance by running a series of transactions across multiple warehouses. It is a widely used benchmark for testing a database's transaction processing capabilities. HammerDB provides a simple and effective way to run TPCC benchmarks on Oracle databases, allowing you to measure metrics such as transactions per second (TPS) and query response time.
Why Benchmark Oracle Database with TPCC?
Running the TPCC benchmark on Oracle Database is beneficial for:
- Predicting Performance & De-Risk Migrations: Benchmarks provide performance baselines under various loads to compare two underlying technology stacks of the Oracle database. The benchmark is constant, and results from two separate environments should help you understand the magnitude of performance improvement or regression you encounter when moving from one to another.
- Performance Analysis: Understand database latency and throughput under a high volume of concurrent transactions.
- Scalability & Capacity Planning: Assess when database performance will degrade so that you can proactively add capacity before users experience delays.
- Optimization: Identify bottlenecks caused by disk layouts or memory configurations under high transaction processing volumes and tune your Oracle Database for better performance.
- Testing updates: Verify the impact of an operating system, database update, configuration changes, or patches on performance.
Now that we have the basics set aside let's proceed with setting up the infrastructure required to run the HammerDB benchmark.
We start by setting up HammerDB on a server that will be in the same VPC/Network as the actual Oracle database.
The following diagram shows the recommended environment for running the benchmarking process with HammerDB. The VPC (e.g., vpc-benchmark) located in the Google Cloud contains the Tessell for Oracle on a GCP instance and the Oracle client/HammerDB installed in another GCP instance in the same subnet.

Steps to Install HammerDB and Oracle Client for TPCC Benchmark
To run the TPCC benchmark on your Oracle database using HammerDB, you must first install both HammerDB and the Oracle Instant Client (if you're connecting to a remote Oracle Database).
Step 1: Provision a Google Compute Engine (GCE) Windows VM
Set Up the Virtual Machine (VM)
- Go to Google Cloud Console:
- Open the Google Cloud Console.
- Navigate to Compute Engine:
- In the navigation menu, click Compute Engine → VM Instances.
- Click the Create Instance button to create a new VM.
- Configure the VM:
- Name: Choose a name for your VM (e.g.,
hammerdb-windows). - Region and Zone: Select a region and zone. This should be the region/zone of your Oracle Database to minimize network latency.
- Machine Type: For moderate benchmarking, you can choose a machine type like
c3d-standard-4(4 vCPUs, 16 GB RAM). - Operating System: Under the Boot Disk section, choose Windows Server 2022 (or another version as needed)
- Name: Choose a name for your VM (e.g.,

- Network Configuration: Ensure that your Windows VM and Oracle Database reside in the same VPC(
e.g., vpc-benchmark) or network to minimize the impact of network latency. If you already have a VPC, select it. If not, create a new VPC with the appropriate subnet. - Create the VM:
- After configuring, click Create to provision the Windows VM. Once created, you will see the VM listed in the VM Instances dashboard.
- Connect to the VM:
- RDP to the VM and proceed with the following steps.
Step 2: Install Oracle Instant Client & HammerDB for Windows
Install HammerDB
- Download HammerDB
- Visit the official website of HammerDB and download the latest version of HammerDB for Windows.
- Extract the .zip file to a directory of your choice (e.g.,
C:\HammerDB).
- Launch HammerDB
- Navigate to the extracted directory (
C:\HammerDB) and double-clickHammerDB.exe to open the application. - The HammerDB interface will appear and be ready for configuration.
- Don’t do anything for now; let’s set up the Oracle instant client first.
- Navigate to the extracted directory (
Step 3: Install Oracle Instant Client
- Download Oracle Instant Client
- If you connect to a remote Oracle database, you need the Oracle Instant Client. Download the Basic Package with the appropriate version for your system from the Oracle Instant Client page.
- For this blog, we are using
Version 21.17.0.0.0

- Also, download the SQL* Plus package for same version, this will allow us to setup sqlplus client for any further debugging in case of issues.

- Install the Client
- Extract both the downloaded ZIP files to a directory, such as
C:\oracle\instantclient. - Add the directory path (
C:\oracle\instantclient) to the PATH environment variable:- Open System Properties → Environment Variables.
- Under System Variables, find the Path variable, click Edit, and add the directory path to your Oracle Instant Client.
- Also add following user or system variables as well.
ORACLE_HOME=C:\oracle\instantclient
TNS_ADMINS=C:\oracle\instantclient\network\admin
LD_LIBRARY_PATH=C:\oracle\instantclient
- Extract both the downloaded ZIP files to a directory, such as
- Test the Connection
- Create the connect string in tnsnames.ora file under
C:\oracle\instantclient\network\admin
- Create the connect string in tnsnames.ora file under

- To ensure proper setup, use a tool like SQL*Plus or tnsping to test connectivity to your remote Oracle database.
- For this blog we used a Oracle database managed through Tessell, setting up a Oracle service from Tessell takes a few minutes.


Now that everything is ready and we are able to connect to Tessell Oracle database server from the client VM, lets get ready to run the benchmark
Steps to Connect HammerDB to Oracle Database
Once HammerDB and the Oracle client are installed, you need to connect HammerDB to your Oracle Database.
Step 1. Open HammerDB
- Launch HammerDB from the directory where it was extracted.
Step 2. Select Oracle as the Database Type
- In the HammerDB interface, go to the Database section in the toolbar and select Oracle from the dropdown menu.
Step 3. Configure Connection Settings
- In the Schema Settings section, double-click on Options and provide the connection details for the database:
- Addionally HammerDB uses as schema to execute the benchmark, default is
tpcc/tpccmake sure this schema is created beforehand.

- Under Setting tab configure the required load setting. Select a number of warehouses, 10 is good for a first test and set the Virtual Users to build schema to the number of CPU cores on your system. Click OK.

- Build the Schema to perform TPCC tests.
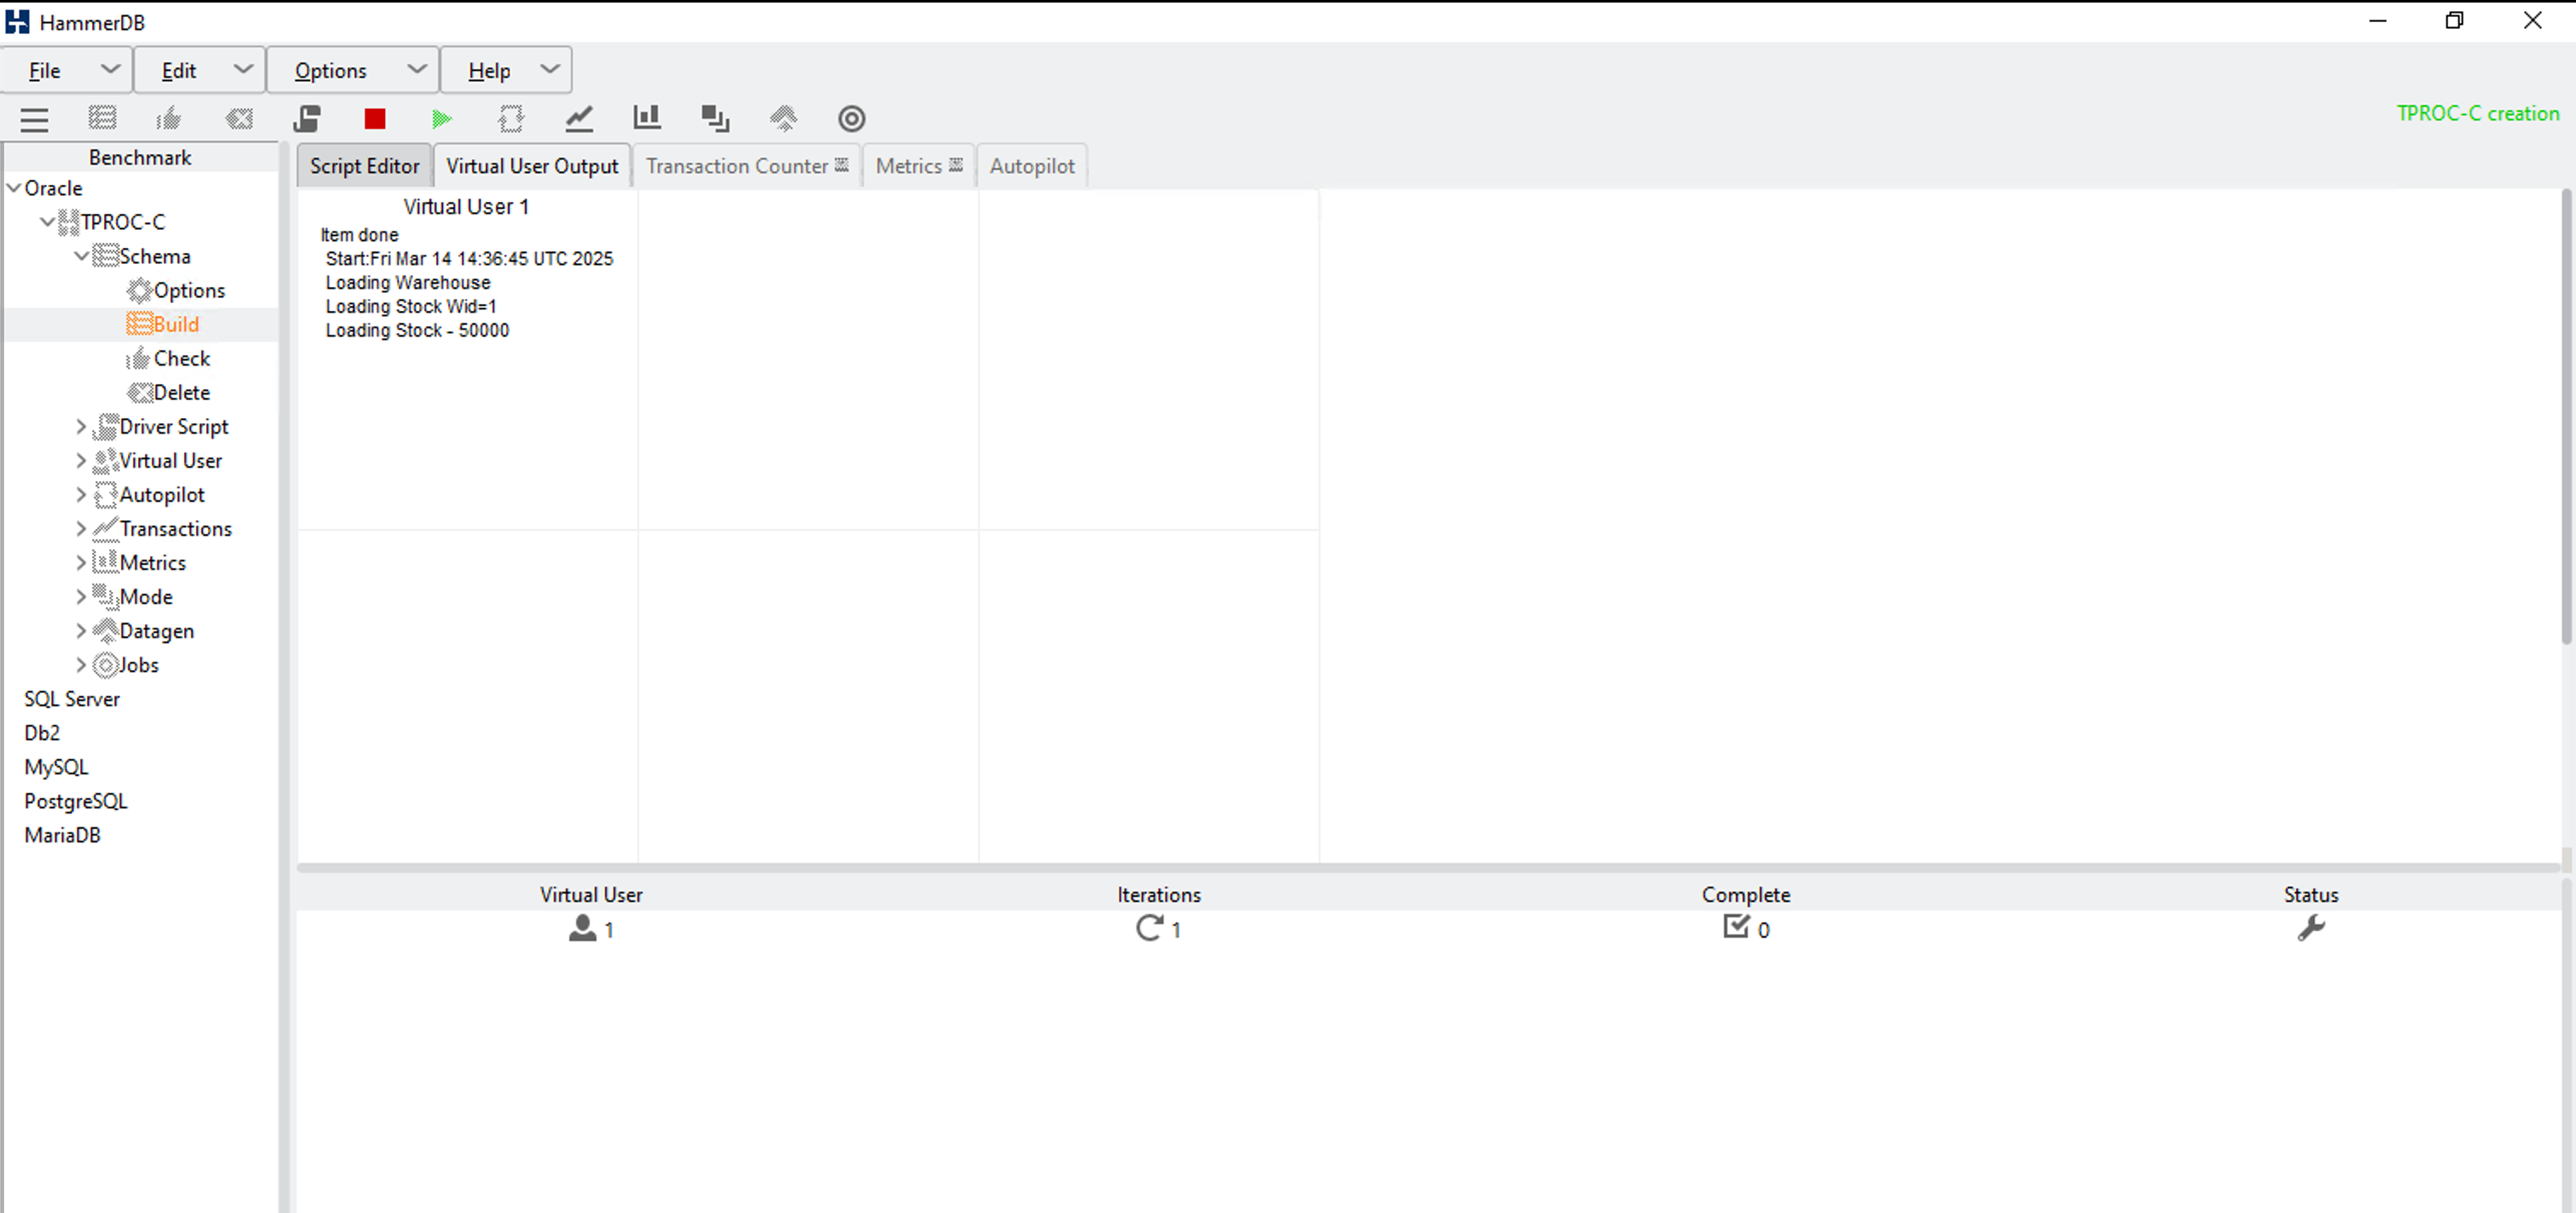
- Under schema click on
Buildthis will open a script which execute some DDLs and loads data under tpcc schema. - Select Yes to start building the schema.
- Under schema click on

- Observe that HammerDB begins to build the schema with configured number of users.
- Wait until the schema build completes and then click on the red button, tagged with Destroy Virtual Users.

With the schema loading completed we can move to the next step of running a test workload load
Steps to Execute the TPCC Benchmark in HammerDB
After connecting HammerDB to your Oracle database, it's time to configure and execute a Timed test workload to capture the TPCC benchmark. Here's how to do it:
Step 1: Select Driver Script option
- Verify the connection setting, this will be pre-filled based on earlier configured settings for schema.
- Click on Settings tab, It is the Timed Workload that should be used to conduct performance tests. Under Driver Options select Timed Driver Script and click OK, the Timed Driver Script is now loaded.

- Verify the Virtual User Options.

- Click create Virtual User and observe that for Timed workloads an additional Virtual User has been created. This Virtual User does not run the workload but provides the timing and monitoring functionality.

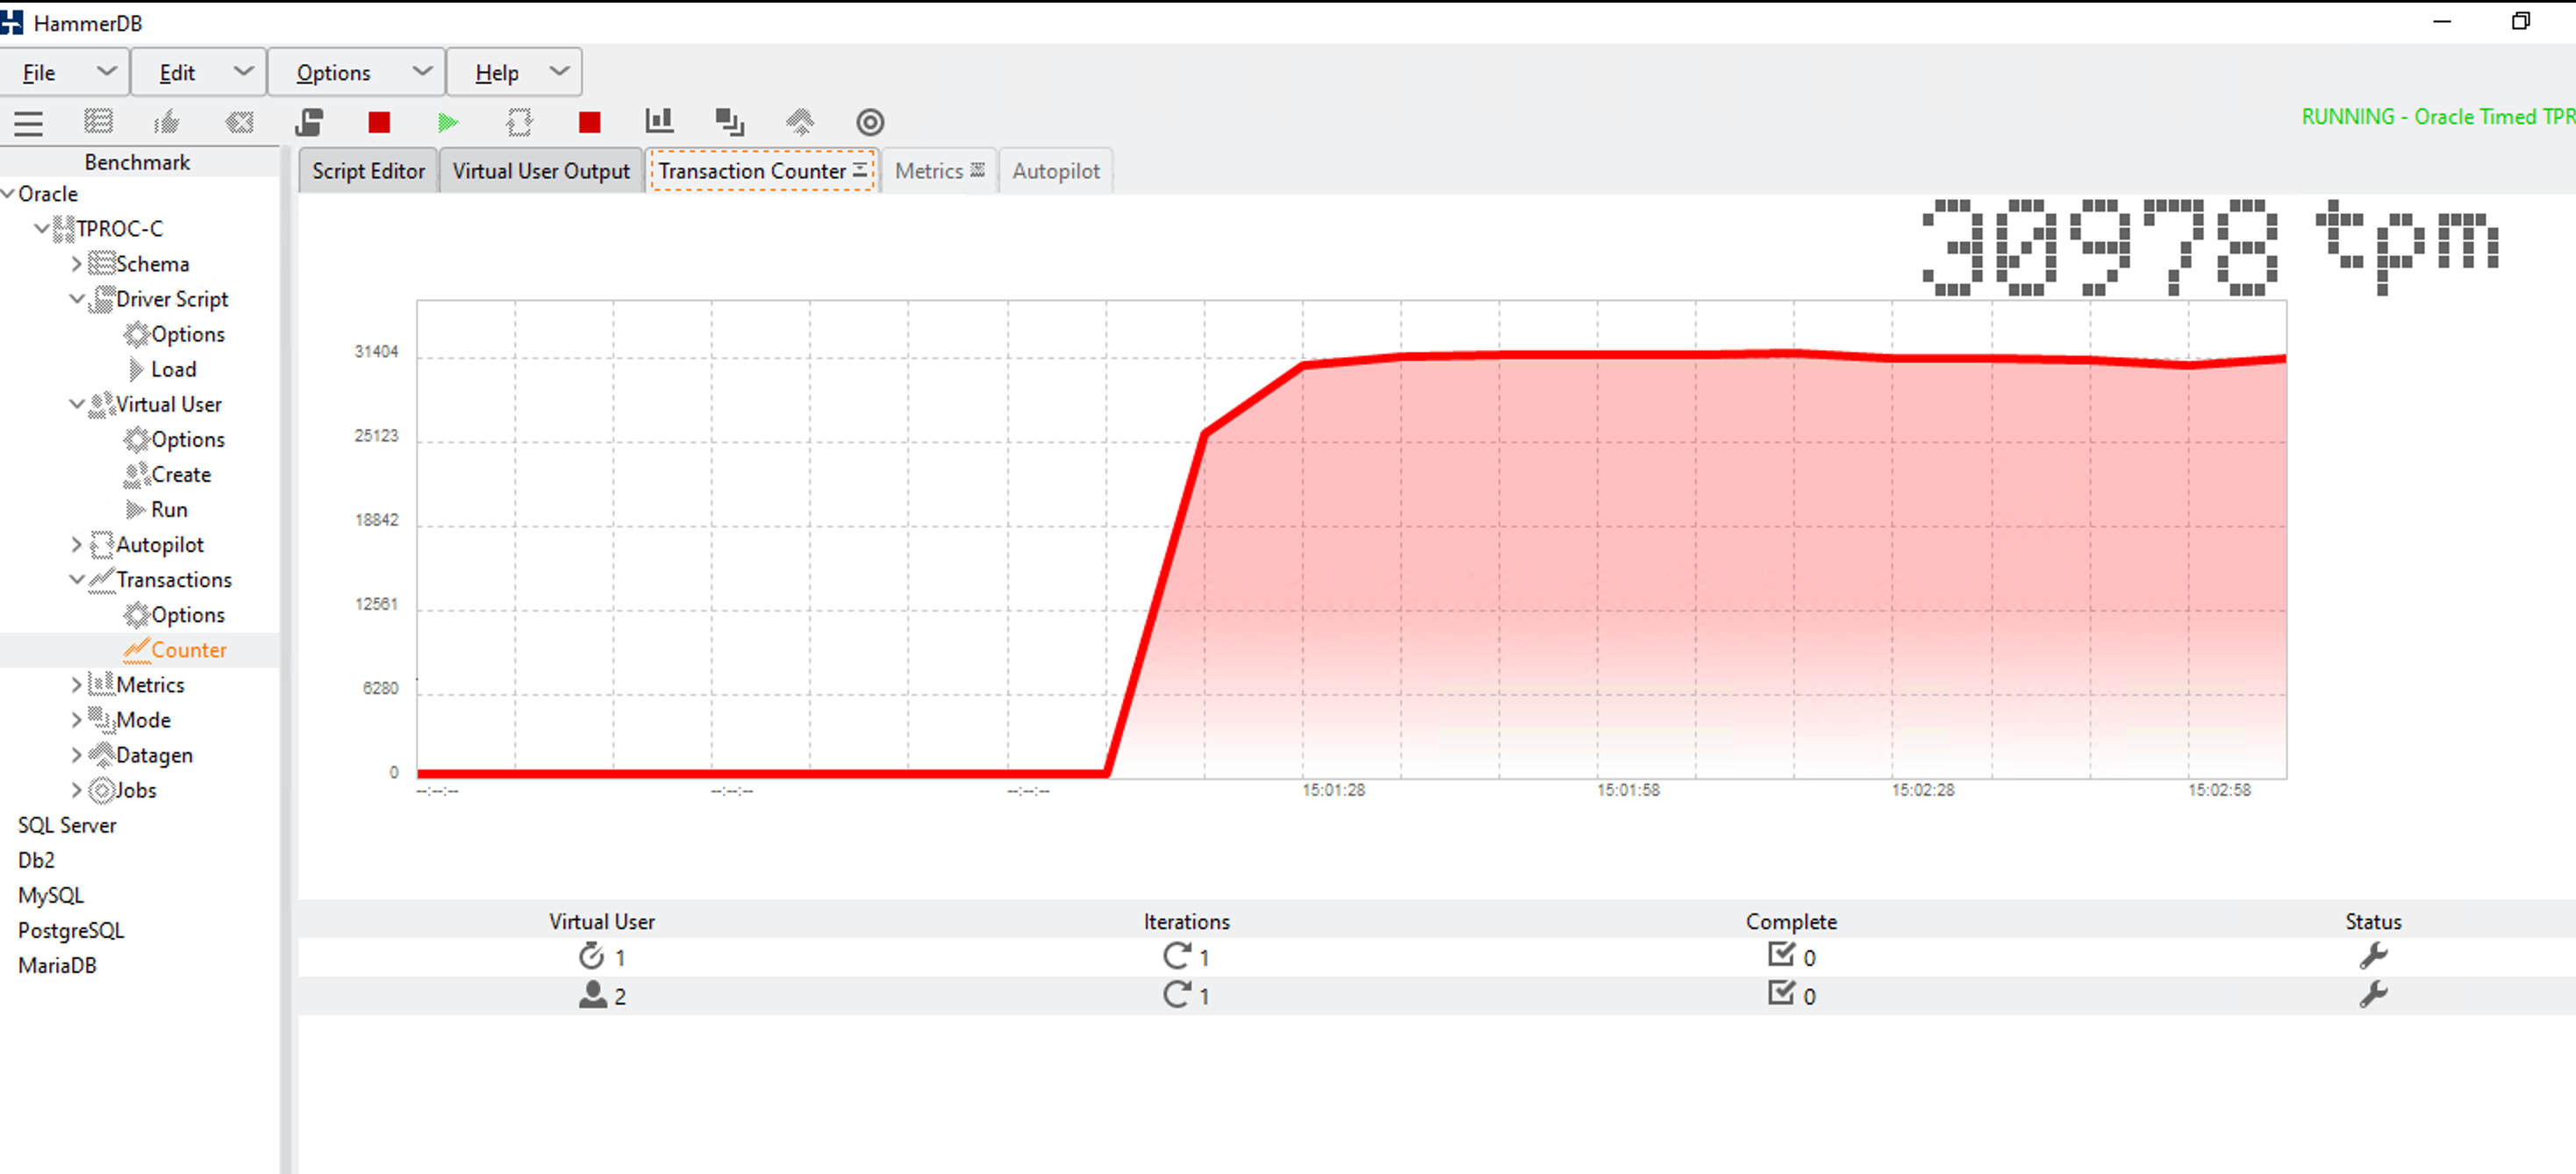
- Click Run, the workload will begin but this time without the Virtual User output being written to the screen. The Monitor Virtual User will provide information on Timing as the workload progresses.

- On completion observe that the Monitor Virtual User reports a value for NOPM and a value for TPM. NOPM stands for New Orders per Minute and is extracted from the database schema and is therefore database independent meaning it is valid to compare between different databases. TPM is the transactions per minute and is a unique value to how each database processes transactions. NOPM is the key performance metric however TPM is the metric that correlates with database performance tools measurement of transactions per second or minute and can therefore be used by database engineers for deeper analysis of database performance.

- During a workload press the Transaction Counter button. This will report the TPM value at a timed interval (default 10 seconds) to the screen.
Review the Results
- Analyze the Results:
- After the benchmark completes, HammerDB will present a summary of the benchmark results. These will include key metrics such as:
- Transactions per minute (TPM): The number of transactions the Oracle database can handle per minute.
- Response Time: The time it takes for each transaction to complete.
- System Throughput: The overall throughput of the database during the benchmark.
- Go to Jobs → Browse to check the report of the benchmark.
- After the benchmark completes, HammerDB will present a summary of the benchmark results. These will include key metrics such as:
- Interpret the Data:
- Review the results and compare them to your baseline or expected performance. If necessary, fine-tune your Oracle database configuration or hardware to optimize performance based on the benchmark outcomes.
Conclusion
Benchmarking your Oracle Database using the TPCC benchmark with HammerDB is a powerful way to evaluate the performance of your OLTP system. By following the steps outlined in this guide, you can easily set up HammerDB, configure it to connect to your Oracle database, and execute a TPCC benchmark. This process will provide valuable insights into your database’s transaction processing capabilities and highlight areas for optimization.


.webp)